Layout Pro v1.0.0
A Plan Production suite that batch-generates Paper Space layouts from Model Space Smart Blocks. Lay out your whole sheet set visually in Model Space, then generate, sync, manage, and export the sheets — all from the Layout Pro ribbon tab.
Every tool has a ribbon button on the Layout Pro tab and an equivalent command you can type. Press F1 while hovering a ribbon button to jump straight to that command's help section below.
| Ribbon panel | Buttons |
|---|---|
| Smart Blocks | Assembly Manager, Insert Assembly, Spatial Renumber, Role Palette |
| Generation | Generate Layouts, Sync Layouts |
| Management | Layouts Manager, Export Layouts, Global Settings, Ribbon Style |
| About & Contact | Help, About, Check for Updates, LinkedIn |
| License (ZWCAD / GstarCAD editions) | Activate License, Deactivate License |
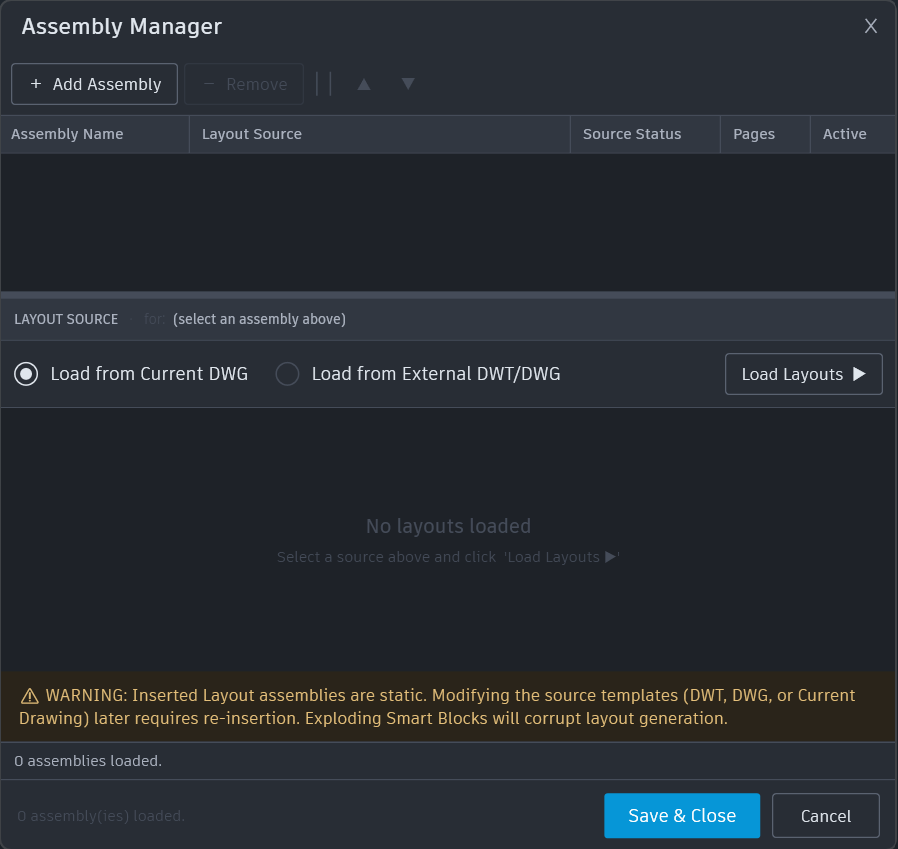
Assembly Manager GR_Assemblies
Define, edit, and delete the layout assemblies stored in the drawing.
An assembly is a reusable set of sheet templates (pages). The Assembly Manager is
the starting point of the workflow: you source Paper Space layouts from the current drawing
or from an external DWT/DWG template, choose which pages belong to
the assembly, and save it. Assemblies are stored inside the drawing's Named Object
Dictionary, so they travel with the DWG.
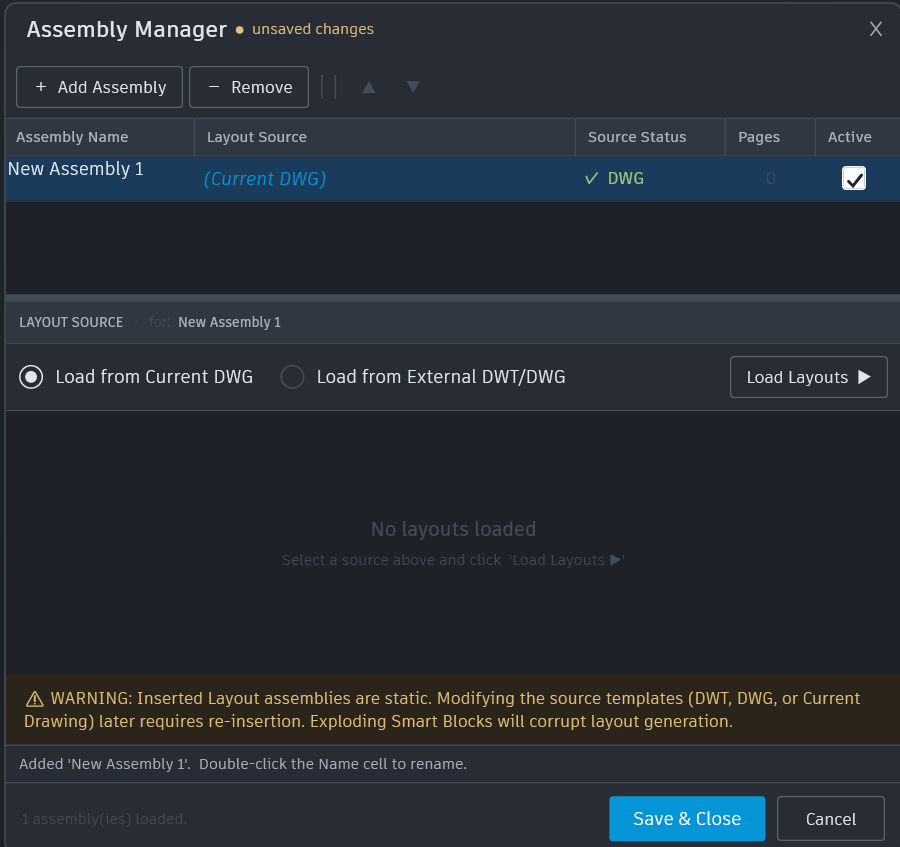
- Open Assembly Manager (Smart Blocks panel) or type
GR_Assemblies. - Create a new assembly and give it a descriptive name (for example, Road Corridor A).
- Choose the layout source: the current drawing's layouts, or browse to an external DWT/DWG standard template.
- Add the pages for this assembly — each page maps to one Paper Space layout from the source.
- Optionally set the naming pattern and mark the assembly Active so it is offered on insert.
- Save. The assembly is written to the drawing and becomes available to
GR_InsertAssemblyandGR_GenerateLayouts.
Insert Assembly GR_InsertAssembly
Insert an assembly's Smart Blocks (Master Frame + Viewport Frames) into Model Space.
Places a physical, unexplodable representation of the assembly over your model. Each
insertion drops a Master Frame (the sheet extent) plus one
Viewport Frame per page, on the non-plottable
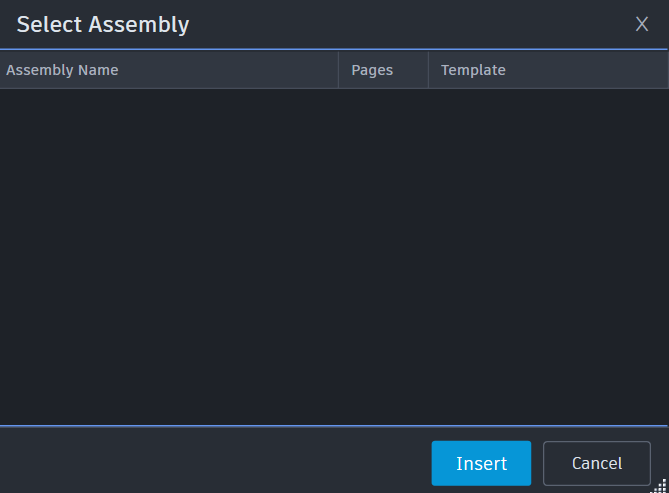
GR_Viewport_Boundaries layer. If exactly one active assembly with pages
exists, it is auto-selected; otherwise a picker lets you choose one or several.
- Run Insert Assembly (
GR_InsertAssembly). At least one active assembly with pages must exist first. - If more than one assembly qualifies, select one or more in the picker; a single valid assembly is selected automatically.
- Pick an insertion point in Model Space for each chosen assembly.
- Position the placed Smart Block over your alignment — move, copy, rotate, or scale it as needed.
- Press ESC at any point prompt to stop the sequence; assemblies already placed remain in the drawing.
Spatial Renumber GR_RenumberLayouts
Batch-renumber viewport Smart Blocks by spatial order from a chosen start page.
Scans the selected Smart Blocks and assigns sequential page numbers based on their physical position in Model Space, so the generated sheet set comes out in the right order. Each block's label is refreshed to match its new page number.
- Run Spatial Renumber (
GR_RenumberLayouts). - Select the viewport Smart Blocks to renumber.
- Enter the starting page number (default
1). - Choose a sort direction: LeftToRight, RightToLeft, TopToBottom, BottomToTop, or SelectionOrder.
- The tool writes the new page numbers, refreshes each label, and regenerates the view.
Role Palette GR_Palette
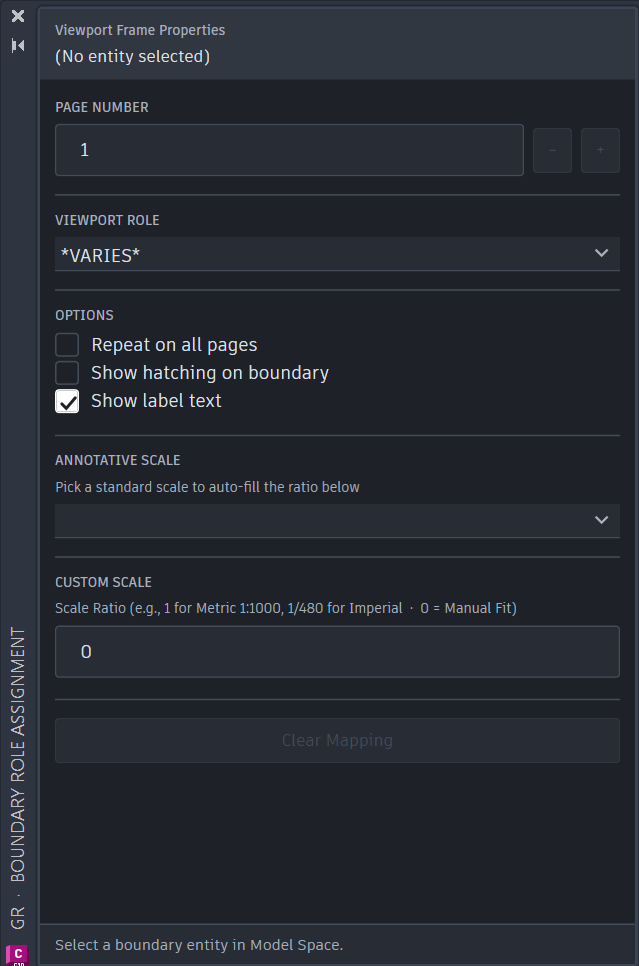
A modeless palette to set each selected block's viewport role, scale, and page.
The Role Palette stays docked while you work. Select a viewport Smart Block and the palette shows its current mapping; adjust its role, scale, and page, and toggle per-viewport options. Because it is modeless, you can keep panning and zooming the drawing with it open.
- Run Role Palette (
GR_Palette) to dock the palette. - Select a viewport Smart Block in Model Space; its current mapping loads into the palette.
- Set the Viewport Role, the Scale (paper units : drawing units, or a custom scale), and the Page number.
- Toggle options as needed: Repeat on all pages, Show hatching, Show label.
- Changes apply to the selected block; keep the palette open and continue selecting other blocks.
Generate Layouts GR_GenerateLayouts
Create Paper Space sheets from the Model Space Smart Blocks.
The core engine. It reads the selected Smart Blocks, duplicates the referenced templates, and mathematically maps Model Space coordinates into the Paper Space viewports — handling view twist, scale, and non-rectangular (polygonal / circular / L-shaped) viewports. Layouts are built at the database level, so there is no tab-switching flicker.
- Arrange your Smart Blocks and assign their roles/scales/pages first (see Role Palette and Spatial Renumber).
- Run Generate Layouts (
GR_GenerateLayouts). - Select the viewport Smart Blocks — one per page is enough.
- The engine creates one Paper Space sheet per page and maps each viewport to its Model Space frame.
- Read the command-line summary: sheets created, viewports synced, and any warnings.
Sync Layouts GR_SyncLayouts
Update existing sheets in place after edits — selection or the [Entire] keyword.
When the project shifts, move or rescale your Smart Blocks and sync. Sync re-applies the block geometry to the existing sheet in place instead of recreating it, so manual annotations and viewport overrides you added by hand are preserved.
- Edit your Smart Blocks in Model Space (move, rotate, rescale).
- Run Sync Layouts (
GR_SyncLayouts). - Select specific blocks to sync, or type the
[Entire]keyword to scan and sync everyGR_VP_block in Model Space. - The tool updates the target viewports in place — existing sheets, annotations, and overrides are kept.
[Entire] after a large project-wide shift instead of window-selecting hundreds of frames by hand.Layouts Manager GR_LayoutManager
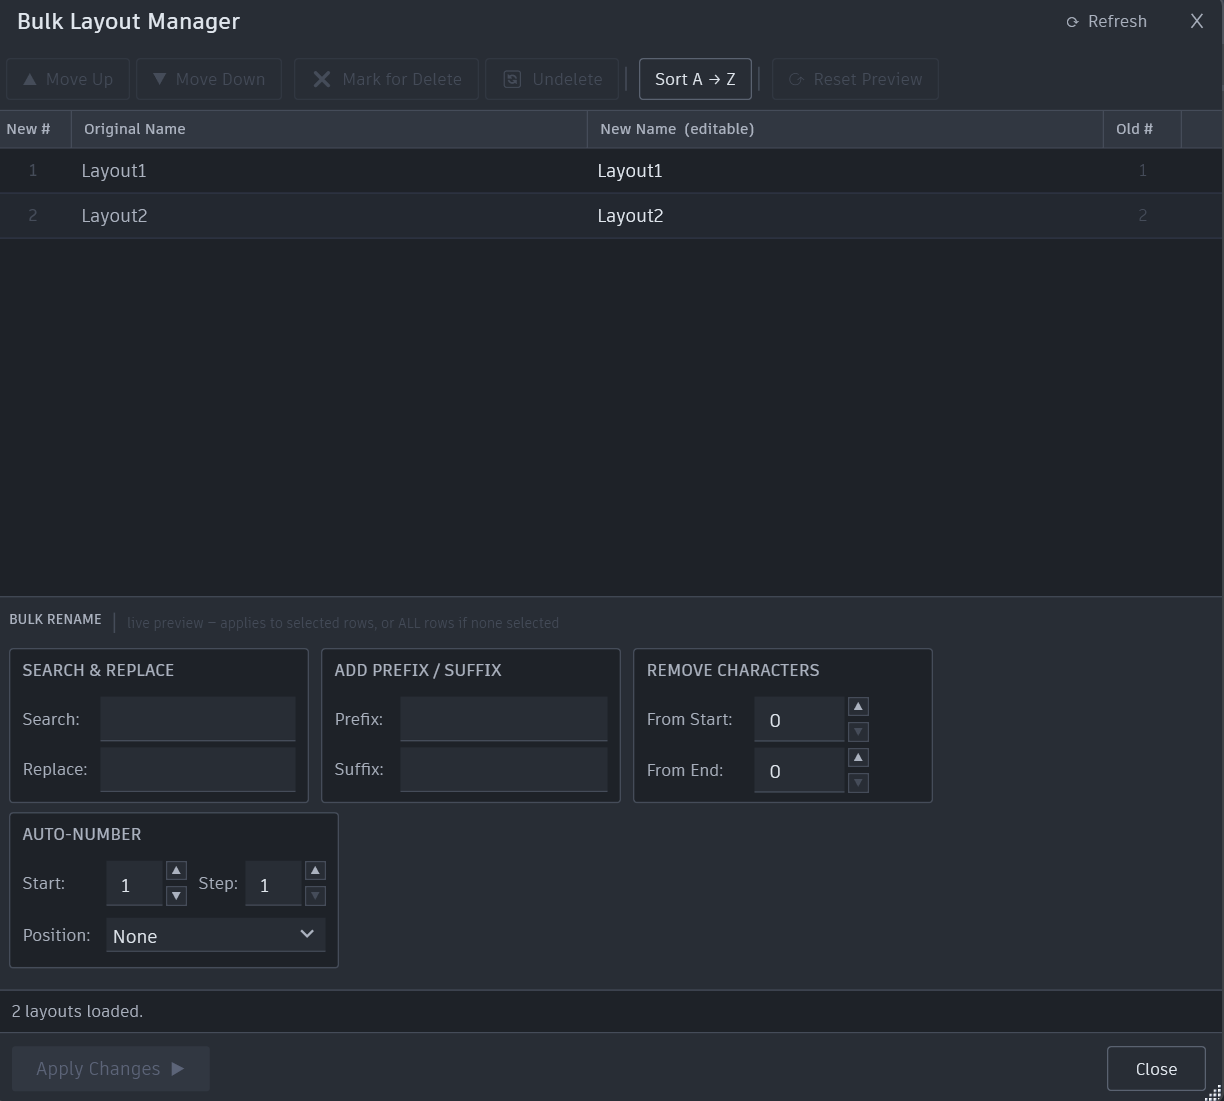
Bulk rename, reorder, and delete layout tabs with a live preview.
A modeless grid of every layout in the drawing. Apply bulk transforms to hundreds of tabs at once, verify the results in the Live Preview column, then commit. It is modeless, so you can interact with the drawing while it is open.
- Run Layouts Manager (
GR_LayoutManager) to open the grid of all layouts. - Apply bulk edits: Search/Replace, Prefix/Suffix, remove characters from the start/end, or auto-number (start + increment).
- Reorder tabs with Move Up / Move Down, and mark unwanted layouts for deletion.
- Check the Live Preview column to confirm the new names before committing.
- Click Apply Changes to commit renames, reorders, and deletions. Use Refresh to re-read the drawing.
Export Layouts GR_EXPORTLAYOUT
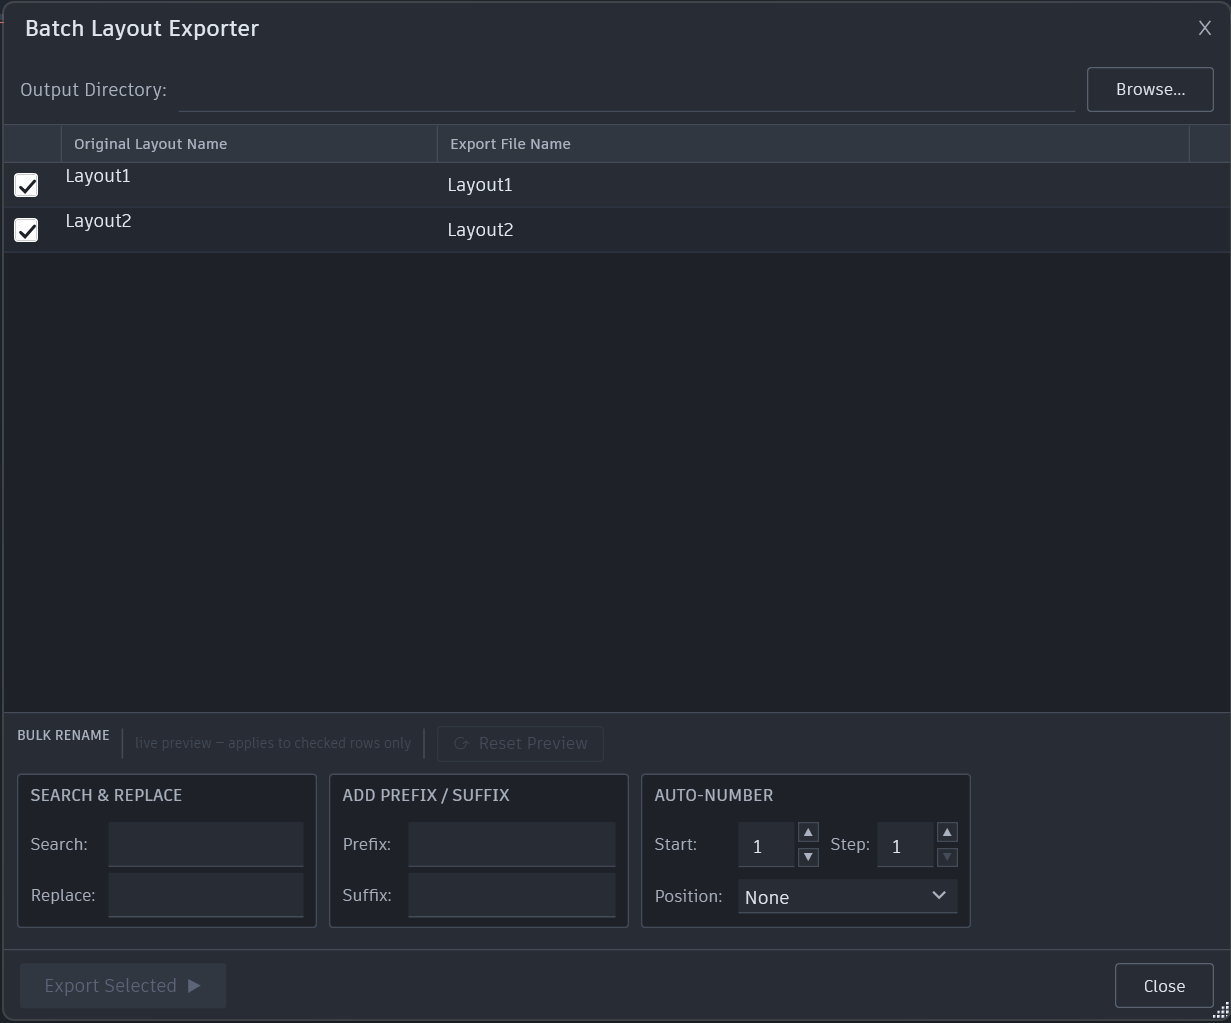
Export selected layouts to individual DWGs with bulk naming and progress.
Isolate your deliverables. Select layouts and export each as a clean, standalone
DWG ready for client submission or coordination. Output file names are built
with the same bulk-naming tools as the Layouts Manager, and a progress bar tracks the batch.
- Run Export Layouts (
GR_EXPORTLAYOUT) to open the exporter. - Choose the output folder.
- Select the layouts to export.
- Configure the output file names: Search/Replace, Prefix/Suffix, and auto-number (start + increment).
- Start the export — each layout is written as a standalone DWG while the progress bar runs to completion.
Global Settings GR_Settings
Labels, frame colors/lineweights, hatch, and the ribbon icon theme.
Controls how Smart Blocks are authored and rendered. Settings are saved to
%AppData%\BatchLayoutGeneratorPro\settings.json and applied to every Smart Block
you create afterwards. The dialog edits a working copy — Save & Close
commits, Cancel discards.
- Run Global Settings (
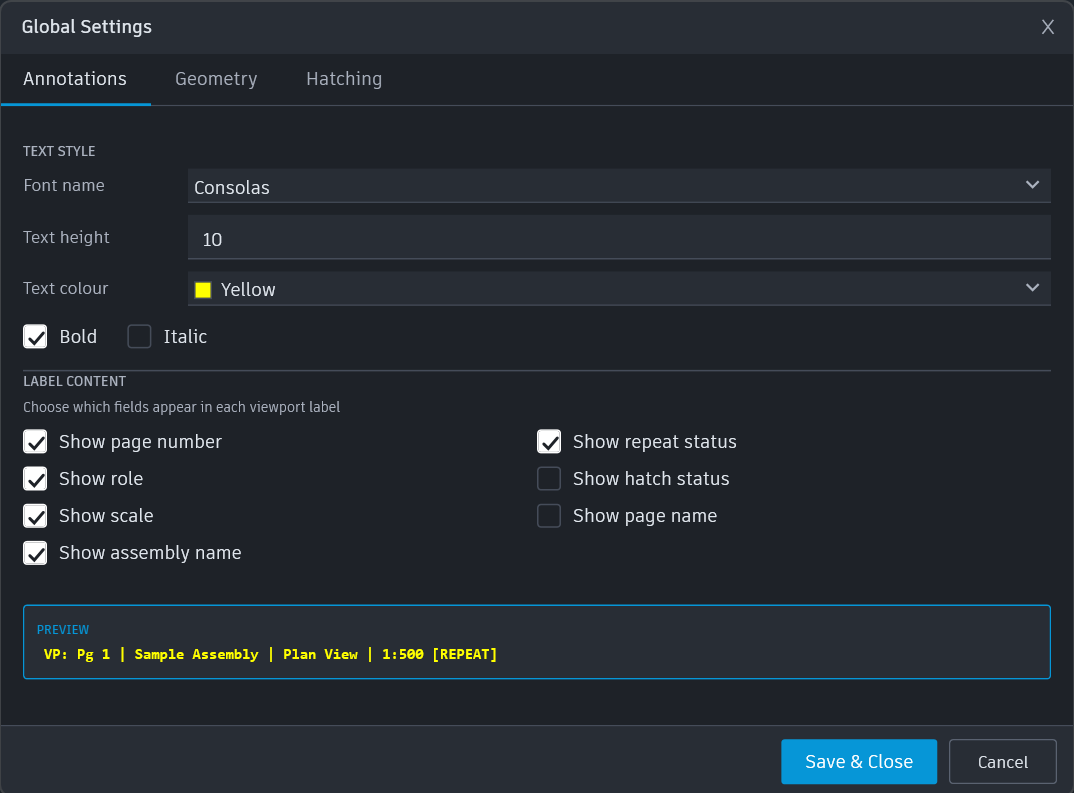
GR_Settings). - Text & Label: set the font, height, and color, and choose which fields appear in the label (role, page number, page name, scale, repeat/hatch tags) — a live preview shows the result.
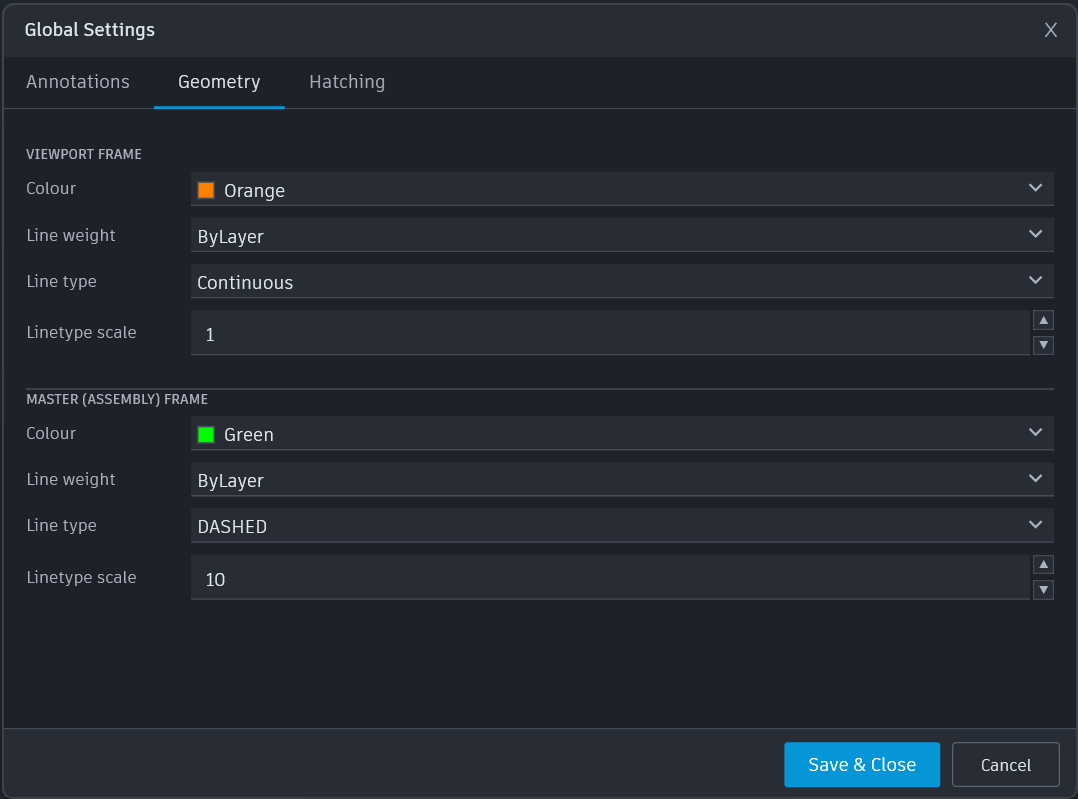
- Viewport Frame and Master Frame: set color, lineweight, linetype, and linetype scale.
- Hatch: choose the pattern, color, scale, and transparency.
- Click Save & Close to persist the settings and apply them to future Smart Blocks.
GR_RibbonStyle command (no restart needed).
Ribbon Style GR_RibbonStyle
Choose the ribbon's icon theme — five vector styles, switched live.
The Ribbon Style drop-down on the Management panel lists the five icon themes; each entry previews the flagship Layout glyph in that theme's own style. Picking one persists the choice and rebuilds the ribbon immediately — no restart needed.
| Theme | Look |
|---|---|
| FlatLine | Single-weight monochrome outlines — the most minimal style. |
| Duotone | Outlines with a colored accent on each icon's secondary detail. |
| TwoTone | Outlines over subtle filled regions — the shipped default. |
| SolidGlyph | Solid filled silhouettes, highest contrast at small sizes. |
| Blueprint | Drafting-style cyan linework on the dark ribbon. |
- Open the Ribbon Style drop-down (Management panel) and click a theme, or
- type
GR_RibbonStyleand pick a keyword —FlatLine,Duotone,TwoTone,SolidGlyph,Blueprint, or press Enter toCycleto the next theme.
Help GR_Help
Open this help page in your browser.
The Help button (About & Contact panel) and the typed
GR_Help command open this documentation in your default browser on every
platform. On AutoCAD you can additionally press F1 while hovering a
ribbon button to jump straight to that command's section; on ZWCAD use the Help button
and the sidebar to navigate. Like About, this command always works — even when license
verification has not completed.
About GR_About
Version and support contact.
Shows the product version and how to reach support. This command is always available, even if license verification has not completed.
| Product | Layout Pro — Batch Layout Generator Pro |
|---|---|
| Version | 1.0.0 |
| Publisher | Green Road Group |
| Developer | Beka Tchigladze — BIM Engineer | C#/.NET Automation Developer |
Check for Updates GR_CheckUpdates
Check online whether a newer version is available.
Contacts the product website over HTTPS, compares the published version against the one you are running, and shows one of three results: up to date, update available (with release notes and a Download button), or could not check (offline / server unreachable). Nothing is downloaded or installed automatically. Like About, this command works even when license verification has not completed — an update may be exactly what fixes it.
- Run Check for Updates (About & Contact panel) or type
GR_CheckUpdates. - The dialog opens in a “Checking…” state and resolves within a few seconds.
- If an update is available, review the notes and click Download to open the release page in your browser.
Activate License GR_Activate
Enter and activate your license key on this computer (ZWCAD / GstarCAD editions).
The ZWCAD and GstarCAD editions are licensed with a key you receive at purchase. Activation binds the key to this machine and is re-validated online periodically; short offline stretches are tolerated. The AutoCAD edition does not use keys — it is licensed through your Autodesk App Store account, so this command only prints a notice there and the License ribbon panel is not shown.
- Run Activate License (License panel) or type
GR_Activate. - Paste the license key from your purchase email and confirm.
- The ribbon's License panel and all commands unlock immediately on success.
Deactivate License GR_Deactivate
Release this machine's activation so the key can be used on another computer.
Frees the activation seat held by this machine (ZWCAD / GstarCAD editions). Use it before
moving to a new workstation or reinstalling Windows. The key itself stays valid —
activate it again anywhere with GR_Activate.
Ribbon Diagnostics GR_RibbonDiag
Support tool: verbose ribbon logging for troubleshooting a missing tab.
GR_RibbonDiag is a typed-only support command (it deliberately has no ribbon
button). If the Layout Pro tab ever fails to appear or a button misbehaves,
run it once: it switches the ribbon builder to verbose logging for the session and writes an
immediate diagnostic snapshot — the loaded JSON library identity plus a full ribbon tab
inventory — to the log file named on the command line
(%TEMP%\GR_RibbonBuilder.log in AutoCAD,
%TEMP%\GR_RibbonBuilder_ZwCad.log in ZWCAD). Send that file with your support
request; a healthy session otherwise writes nothing.